17+ Stunning Bling Nail Ideas to Sparkle in Style
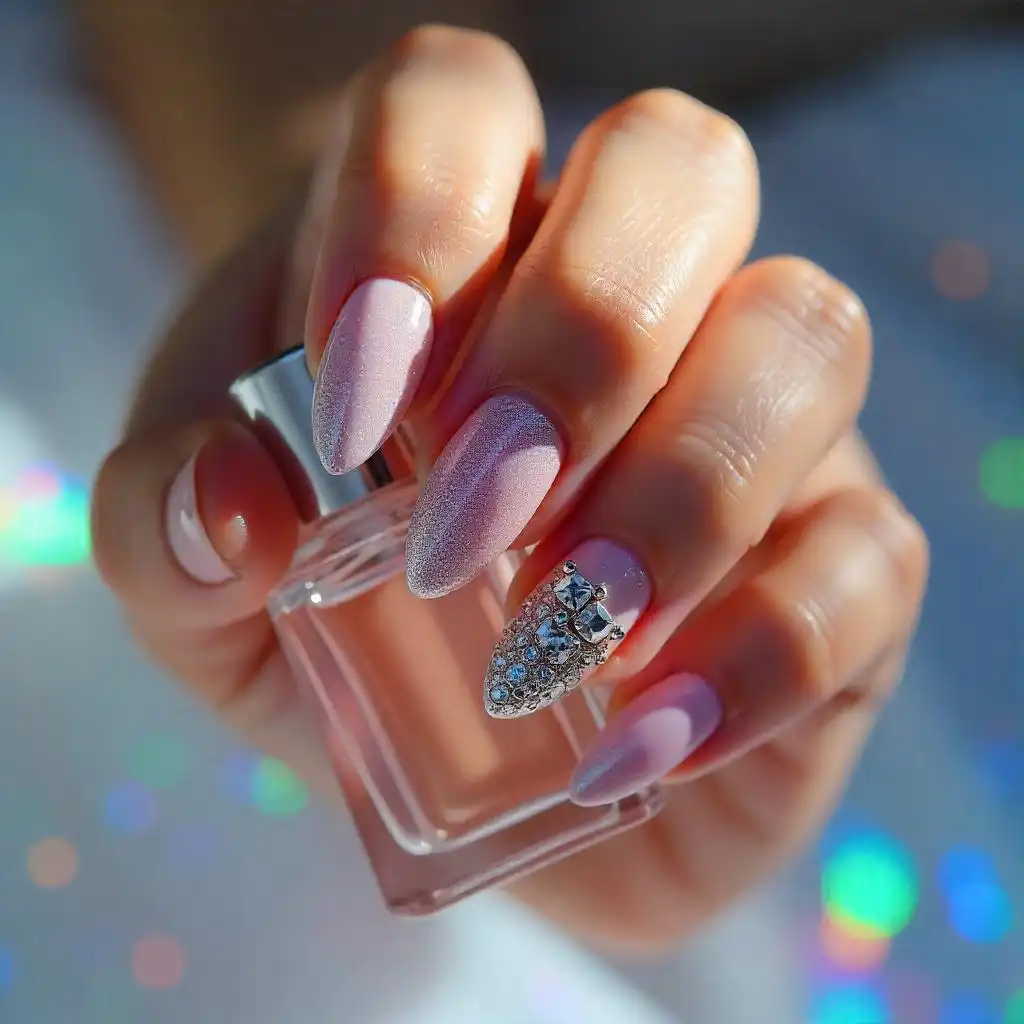
Looking for bling nail ideas that are easy yet dazzling? Add tiny rhinestones, glitter dust, or a swipe of chrome polish to any basic manicure and you instantly get nail art that shines at parties, weddings, or even a casual day out. These simple, sparkly touches turn plain nails into eye-catching accessories without much effort, so you can sparkle wherever you go. 19 Easy Bling Nail Ideas Single Rhinestone Charm Put one small shiny stone near the bottom of each nail. It looks simple and pretty. This rhinestone nail idea is easy to do and makes your nails look clean with a little sparkle. Great for everyday style. Glitter Gradient Tips Use silver glitter on the tip of your nails. Brush it halfway down. This sparkly manicure is shiny but not too bright. It looks soft and beautiful. You can wear it to school, parties, or even at home. It’s quick and very easy to try. Mirror-Chrome Shine First, paint your nails black. Then, rub chrome powder on top. These chrome nails shine like metal. They look cool and modern. You don’t need any stones. This nail style is good if you want shiny nails without doing too much work. Pearl & Gold Pair Paint nails soft pink polish. Then, put small pearls in a line and add gold tape on the sides. These pearl bling nails look soft and classy. They are good for weddings or any special day. Easy and beautiful at the same time. Gemstone Mosaic Pick one nail and decorate it with small gems. You can mix round and square gems to make a cute pattern. This diamond nail art looks shiny and fun. Keep other nails plain. It’s a great idea if you want only one nail to sparkle. Silver Striping Lines Stick two thin silver lines across each nail. This metallic nail bling looks neat and shiny. You don’t need any gems. It’s a fast and clean style for school, work, or daily wear. Neon Gem Pop Use a clear polish and add bright neon gems on top. This bling nail idea is bold and fun. It’s great for parties, concerts, or holidays. The colors really stand out and make your nails look cool and different from others. Nude Half-Moon Sparkle Paint nails nude, but leave the bottom (half-moon) part plain. Then add some glitter on top. This nude nail design is shiny but still soft. It’s simple and looks nice for school, home, or even a small event. 3-D Crystal Flower Put five tiny rhinestones in a circle on one nail to make a flower. This easy 3D nail art looks pretty and cute. You don’t need many tools. It’s perfect for birthdays, holidays, or just to try something new and fun. Matte Black Diamonds Coat your nails with matte black polish. Add one clear gem in the center of each nail. This gives a bold and classy black bling nails look. The shiny stones and the flat black mix well. Good for evening events or special days. Holographic Glitter Wash Wash Put a thin layer of shiny holographic glitter over any nail color. It makes your nails sparkle in the light. The color changes when you move your hands. This is a fun and magical style that’s great for both day and night looks. Ice-Blue Snow Queen Color nails light blue. Then add silver gems to give a cold, shiny look. These glitter nails feel like winter snow. Perfect for winter season, parties, or any day when you want cool and fresh-looking nails. Rose-Gold Foil Flakes Use a soft base color, then press little rose-gold foil pieces on top. These foil nails shine but look natural too. It’s a quick way to add beauty. Great for weddings, Eid, or even regular days when you want a special touch. Star-Studded Night Sky Color nails dark blue. Then add tiny gold star gems on top. This star bling nail art looks like the night sky. It’s perfect for nighttime parties or special photos. Very dreamy and easy to make at home. Sequin Confetti Party Add colorful sequin dots on clear or light polish. These confetti nails are fun and bright. They look like balloons or party lights. Great for birthdays or when you just want your nails to feel happy and full of color. Metallic French Tips Swap white tips for thin silver-metallic polish, then add a micro stone at each corner for chic French bling nails. Rainbow Crystal Ombré Dye nails light pink or nude. Then, use silver polish on just the tips. Add a small stone on each side. These French bling nails are simple but stylish. Good for school functions, weddings, or office days. Crystal Accent Nail Decorate only your ring finger with shiny gems. Leave the rest plain or glossy. This accent nail idea is easy but eye-catching. It adds just the right amount of sparkle without doing too much on every nail. Foil & Rhinestone Mix First, press some gold foil on the nail. Then, add one small rhinestone on top. These foil and rhinestone nails look rich and beautiful. It’s a lovely idea for weddings, parties, or any special day where you want your nails to shine. FAQs Are Bling Nails Hard To Do At Home? No, many bling nail ideas are very easy. You just need some rhinestones, glue, and a clear topcoat. Even beginners can create a sparkly manicure with simple designs. How Long Do Rhinestone Nails Last? With good nail glue and a topcoat, rhinestone nails can last 5 to 10 days. Using gel polish makes them last even longer. Can I Do Bling Nails On Short Nails? Yes! Even short nails can look beautiful with tiny gems, glitter, or foil. You don’t need long nails to enjoy bling nail art. What’s The Best Polish For Glitter Or Gems? Gel polish is best for holding glitter and nail gems in place. But regular polish also works if you seal it with a strong topcoat. … Read more